How To Install Rubber Flooring - Mats, Tiles and Rolls


Related Product: Rubber Flooring Rolls Geneva 1/2 Inch 10% Premium Color Per SF
With that being said, make sure to follow the instructions of your rubber flooring manufacturer when installing any type of rubber floor. As a general rule, these are the most common forms of installation.
Rubber Mat Installation
Straight-edged mats, such as your standard 4x6 foot stall mats, are the simplest and almost always dry-laid. The key to installing multiple straight-edge mats is to make sure you have a completely level surface that is well compacted.If installing in places such as barns or stables, you may not have a concrete floor. In this case, make sure you have a fine layer of compacted crushed rock to install the mats over. Beware that the use of gravel or other rock of large or varying pebble sizes under your mats may cause bumps in your flooring. This can be especially problematic if a large rock is located near a seam, as it can cause the mats to separate or be uneven, creating a tripping hazard or spot where shavings and other bedding can work their way between or under the mats. Over time, this inconsistency in the flooring will continue to worsen if left unattended to.
The same applies to installations over concrete, wood, tile, or other flooring surfaces. Make sure your existing flooring is completely level to ensure the most uniform rubber flooring surface.
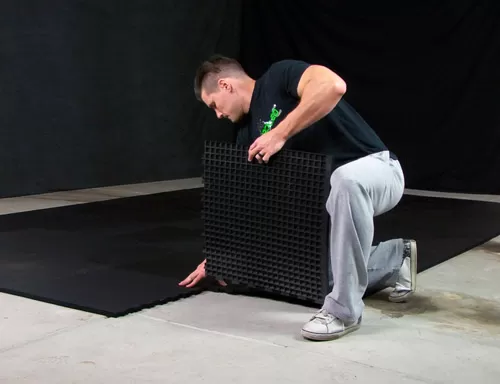
The fact that these tiles are quite heavy can work both for and against you. It can make the installation process more difficult because it will most likely require more than one person to maneuver the mats, especially if you must transport them through narrow doorways, hallways, or, heaven forbid, stairways.
On the plus side, the weight of the mats will help keep them in place once installed - without the need for adhesives. Plus, the bigger the area you cover, the less likely that the mats will shift, as the other heavy mats will serve as anchors for each other.
Rubber Tile Installation
Rubber tiles offer the largest variation in installation methods. Many of them will interlock together in some form to prevent separation. However, the style of interlocks can vary in an infinite number of ways. Some are designed much like puzzle pieces. Others use a pinning method. Some may use a system much like tongue and groove when firm flaps of one tile fit neatly into the groove of another. Yet others may need adhesive to connect the tiles together, bond them with the floor, or both.Some interlocking systems, known as universal interlocks, allow you to connect tiles facing in any direction. Others may require all tiles to face in the same direction to properly connect and/or keep the surface pattern uniform. Some tiles are reversible, while some may have a unique support structure on the underside for impact absorption, noise control, drainage, or other functions that prevent you from flipping them over and using either side as a finished surface.
When installing interlocking rubber tiles, it is critical to understand the function of the interlocks and how they work together before beginning the installation process. This will save you a lot of time and headaches from redoing part or all of your installation.
Depending on the style of interlock, your manufacturer may advise you to start either in the center of the room and spiral outward or begin in a corner and work outward in a triangular fashion.
The convenient sizing of rubber tiles makes the installation process much more feasible for a single person, but it also may be a little bit slower and more tedious for large areas. The weight of the tiles is significantly less, meaning you'll want to make sure you have a way to keep your flooring in place - whether that means placing heavy equipment on it, installing a large enough area that the overall weight and interlocks work together to keep it in place, or making sure you have edges up against walls or other fixed objects. In some cases, double-sided tape or adhesives may be recommended to prevent shifting.
If you are doing a wall-to-wall installation, it's also important to remember that temperature and humidity fluctuations can affect your flooring in the form of expansion and contraction, so make sure you leave enough room around the edges for your floor to expand without buckling.
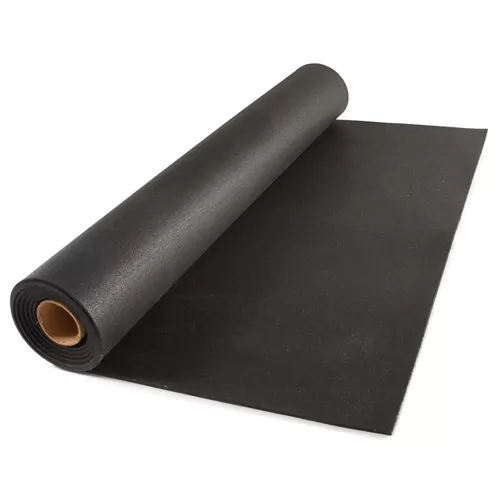
Rolled Rubber Installation
Assuming you have enough help, or you have small enough rolls, rolled rubber is probably the fastest form of rubber flooring to install. Simply lay your roll down at one end of the room and give it a push, and you've covered a fairly large area in a flash. Most rubber rolls are about 4 feet wide and have lengths ranging from 10 to 100 feet.Since rolled rubber has straight edges, just butt the edges up next to each other to cover wider areas.
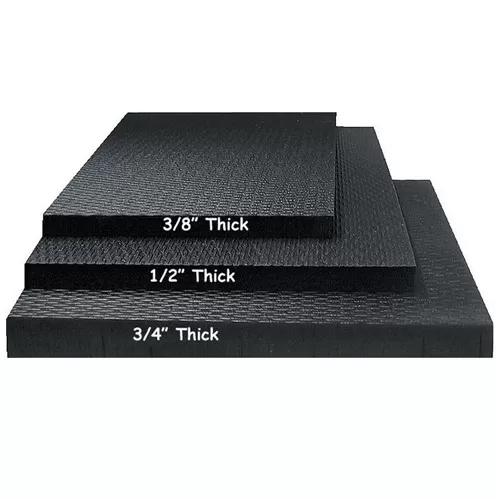
Rolled rubber is most often the thinnest version of rubber flooring, so having that hard, level surface to install on is even more critical. You won't want to install most rubber rolls over dirt, rock, sand, or grass. You'll even want to go so far as to make sure the existing floor is thoroughly swept or shop vacuumed before laying down your rolled rubber flooring, because many imperfections in the topography of your existing floor will be reflected in the surface of your rubber flooring. The thinner the rubber roll, the more this will be the case.
Although rubber material in itself is an inherently dense and heavy material, properly sized rubber rolls are a popular form of temporary or portable flooring because they can be so quickly rolled out and don't require a lot of storage space when rolled up.
Permanent rolled rubber flooring installations are commonly adhered to the existing floor, depending on their intended purpose, using double-sided tape or special glues.
Cutting Rubber Flooring
When it comes to customizing your rubber mats, tiles, or rolls to fit a wall-to-wall installation or go around obstacles, such as support columns or counters, cutting the flooring comes into play.
Many novice installers have found themselves amidst a frustration tantrum in this stage of the installation process, but that doesn't have to be the case. With just a few simple tools, you can custom cut your rubber flooring. It doesn't require a lot of elbow grease, time, or expensive equipment - just a sharp utility knife, straight edge, and a 2x4 board. If you choose to use power tools, be prepared to have some extra blades on hand, as the rubber material will want to grab ahold of your blade.
Whether you are using a utility knife or power saw, some people also prefer to have some sort of lubricant, such as WD-40, on hand to reduce friction on the blade, but that is a personal preference.
We've found the utility knife and 2x4 method to be the easiest and least messy. With this method, simply place the 2x4 under the rubber material in the area you'd like to cut and let the mat drape over either side of the board. As you start cutting with the utility knife, make a series of shallow scores, and you'll see the cut begin to open up as it folds over the board. This will minimize friction against your blade and allow you to continue to make a nice clean cut until you are all of the way through the mat. Use a straight edge as a guide for your blade to follow.
If you prefer to keep your mat flat for the cutting process, that's when you may want to try spraying some WD-40 on the blade because the rubber will remain against the blade, making it harder to keep your blade in motion. The lubricant will help cut back on how much energy you'll need to expend in fighting the friction against your blade.
Should you choose the power saw method, depending on what type of saw you are using, the thickness of your mat, and how large of a cut you are making, you may find the saw wants to bind up, break a blade, and/or melt the rubber. The larger the cut, the more this can become problematic. This is why we recommend the utility knife method.
Cleaning and Maintenance
Regular maintenance is essential to keeping your rubber flooring looking nice for years to come. When properly cared for, your rubber floor will last for decades. The most common rubber mat, tile, or roll color is solid black. Be aware a solid, deep black floor will show any dust or debris that may rest on its surface. Dusty shoes or boots will inevitably leave a perfect dust print on your nice new or freshly cleaned floors. The more color flecks you have in your flooring, the more it will disguise this situation.
Daily vacuuming is recommended for all indoor rubber floor surfaces. For outdoor flooring, regular clearing of debris can be done with a simple broom. For more thorough cleaning, most exterior floors can be hosed down with a garden hose. For interior rubber floors, a damp mop and common household floor cleaners can accomplish the task. Just make sure whatever cleaner you use has a neutral pH. Should you need a more aggressive scrubbing, a soft nylon brush is recommended.
One thing to keep in mind when using liquids to clean rubber floors is that some rubber materials are more porous than others. For instance, a vulcanized rubber surface is completely waterproof. While non-vulcanized rubber floors will not necessarily absorb water, they do have tiny pores that may allow water to permeate into the floor over time if soaked or power washed. Plyometric rubber specifically is designed to be less dense than other standing rubber flooring materials to offer greater cushion. With the additional cushion also comes a more porous surface. Damp mopping is still fine for this type of flooring, but pay special attention to resist overdoing it in the soapy water department.
Another thing to keep in mind is that a vulcanized rubber will have a stronger rubber smell than non-vulcanized rubber. This will dissipate over time, and the process can be sped up with regular cleaning. If you don't have the product specifications handy, a quick guide for determining whether your rubber flooring is vulcanized or not is to look closely at it. If it has a smooth, shiny surface in which it is hard to make out any grains, it's most likely vulcanized. Non-vulcanized rubber typically looks like rubber crumbs compressed together, and the pores are visible.
We hope you enjoyed this article and learned something helpful. For more information like this, be sure to check out the Greatmats Buyers Guide.