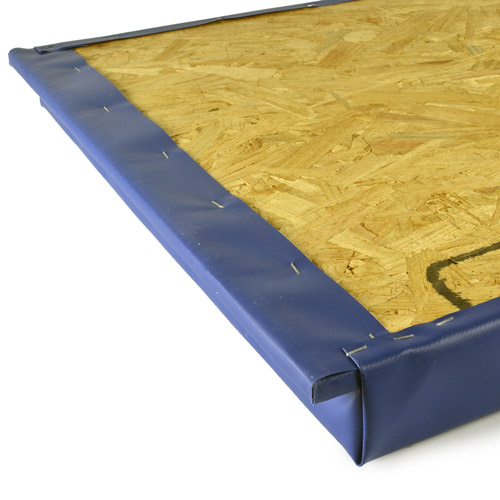
How to Trim Down Wall Padding with Top & Bottom Nail Margins
Related Product: Safety Wall Pad 2x5 Ft x 2 Inch WBLipTB ASTM
How to Trim Wall Pads with Top and Bottom Nail Margins
You may need to trim your wall pads for several reasons, such as to accommodate objects already installed on your walls or to make room for new installations.Before you trim your wood-backed wall pads with top and bottom nail margins, gather the following tools:
- Pen or marker
- Yardstick or measuring tape
- Screwdriver to remove staples
- Circular saw
- Utility knife
- Staple gun and staples
To trim your wall pads, you’ll start by measuring and trimming away the wood board and foam:
- Turn the pad upside down so you’re looking at the wood backing.
- Measure and mark the area to be trimmed on the wood backing of your pad.
- Remove the staples from the top, bottom, and backside of the pad and pull the vinyl back so it’s out of the way.
- Remember to remove all of the excess staples when you pull the vinyl back.
- Using a straight edge, draw a line from mark to mark. Measure a second time to double-check your accuracy before proceeding.
- Using a circular saw, cut along the marked line on the wood.
- Use a utility knife to finish cutting the foam. Make sure you don’t cut through the vinyl.
Once you’ve trimmed the board and foam to your desired dimensions, you’ll need to reattach the vinyl to the board, essentially rewrapping the pad:
- Reattach the vinyl to the front of the pad by stapling along the front edges.
- Trim off excess vinyl with a pair of scissors.
- Staple the vinyl to the wood backboard. Start stapling on the top and bottom and finish with the longer side. Pull the vinyl taut as you staple it.
With your wall padding reassembled, you can follow the regular installation instructions.
How to Avoid Having to Trim Down Wall Padding
While you can trim down wall padding yourself, you can avoid making any modifications to the padded boards by ordering them to fit your gym’s setup. Once you determine which walls you want to install wall padding on, carefully measure the dimensions of each wall.At Greatmats, we offer products like the Safety Wall Pads in standard dimensions, including 2x4 feet, 2x5 feet, 2x6 feet, 2x7 feet, and 2x8 feet. Additionally, we offer these mats in custom dimensions to fit your gym. If you have an unusual wall size or a wall that needs a custom mat to accommodate objects, we can build a mat to meet your measurements. This option will save you time modifying your gym wall padding before being able to install it.
Additionally, we offer other custom options that help ensure your gym wall pads are exactly as you want them. While the mats are available in 19 standard vinyl colors, we can also create mats with custom logos and graphics to reflect your school or business branding.
Order Your Gym Wall Padding From Greatmats
The above instructions on how to cut wall padding can help you modify your existing wall pads, but when you order from Greatmats, our custom wall pad options can ensure that you don’t have to cut them to fit at all.Plus, when you order from Greatmats, you’ll be purchasing mats designed from top-quality materials, like 18.5-ounce vinyl and 2-inch-thick foam for maximum protection. We ensure mats are safe for your facility; they’re created with Class A fire-rated PVC vinyl, and they have anti-mildew, anti-fungus, antimicrobial, and antibacterial properties to keep athletes safe.
Contact our customer service team today with any questions or to place your order for custom gym wall pads.
