How to Install Interlocking Floor Mat Tiles


Related Product: Foam Kids and Gym Mats Premium 5/8 Inch x 2x2 Ft.
When it comes to interlocking floor mat installation, the process is really pretty easy. You'll need to give some thought to whether a wall-to-wall or island installation is right for you.
Tips for a Successful Interlocking Floor Mat Installation
Before you begin your interlocking floor mat installation, review these tips to make sure that you're setting yourself up for a successful experience.- Use the Pro Floor Designer. Greatmats' Pro Floor Designer is an online tool that helps you to determine exactly how much product you'll need to order for your project. There's nothing worse than coming up short on product partway through an installation, so take the time to make sure that you order enough flooring for your needs.
- Review the installation instructions for your product. Every product is different, and some products require specific tools, like a particular adhesive. Review the instructions on installing the specific product that you've purchased.
- Always start with a flat, even, and dry subfloor before you begin your installation.
- If your product expands with temperature changes (such as foam tiles), be sure to remove it from its packaging, place it in the room where it's to be installed, and give it time to acclimate. Refer to the product specifications for more information on this process.
- Gather all of the tools that you'll need (such as a straight edge and utility knife if you need to cut the tiles) before beginning your installation.
- Allow yourself more time than you anticipate needing during the installation. This way you won't be feeling rushed, and can take your time and do the installation correctly.
- If you'll be installing mats with a particular pattern or design in mind, sketch this out on paper ahead of time. Identify which colored mats need to go where in the room.
The exact methods that you'll use for installing interlocking floor mats will differ according to the type of mats you're working with. We've outlined installation steps for each of our most popular mat types below.
Interlocking Foam Mats
Interlocking foam mats are probably the easiest products to install. They're lightweight, easy to handle, and are conveniently sized, so getting the mats into place is easy and fast. A single person can handle the entire installation, and there's no adhesive required. Interlocking foam mat installation is fast and easy, though the exact amount of time you'll need will depend on the size of the room you're working with and how much help you have.Wall-to-Wall Interlocking Foam Mat Installation
When installing interlocking floor mats for a wall-to-wall design, it's important to plan the floor out so that you leave at least a 1/4 inch gap between the edges of the floor and the surrounding wall. Foam expands and contracts with temperature and humidity fluctuations, and this gap allows the foam to expand without bubbling up.To perform your installation, start in one corner of the room and work outwards. If your foam mats come with border strips, install these border strips on the exterior tiles as you install them. To fit the tiles together, align their edges and press down to connect them, much like connecting puzzle pieces - only easier. Work your way out to the opposite wall and into the room.
When you reach the opposite wall, you will probably need to cut the foam mats to fit. When you reach the last tile to be installed, measure the gap between your last tile and the wall to determine where you need to cut. (Remember to leave a one quarter inch gap between the tile's edge and the wall.) Using a straight edge, cut down into the tile with a sharp utility knife.
Make multiple shallow scores until you work your way through the tile. It's advisable to put a piece of cardboard beneath the tiles as you cut to help prevent cutting your subfloor. Once your cuts are complete, you'll be left with a clean, finished edge.
If the foam tile starts to shred as you cut it, the blade in your knife is too dull and needs to be replaced.
Install border strips on any remaining edge tiles, and you're finished.
Island Interlocking Foam Mat Installation
You can also create an island installation using interlocking foam mats. Installation is still simple. Decide on where you want your installation to be located in the room, and start in the center of what will be your new foam floor. Work outwards, attaching tiles by lining up the edges and pressing down to connect them.Once you have your tiles in place, you can add on the border strips to create a clean, finished edge. Note: Depending on how large of an island you are creating, most foam puzzle mats are lightweight enough that you'll be able to shift the mat into your desired location, even after you've finished connecting the tiles.
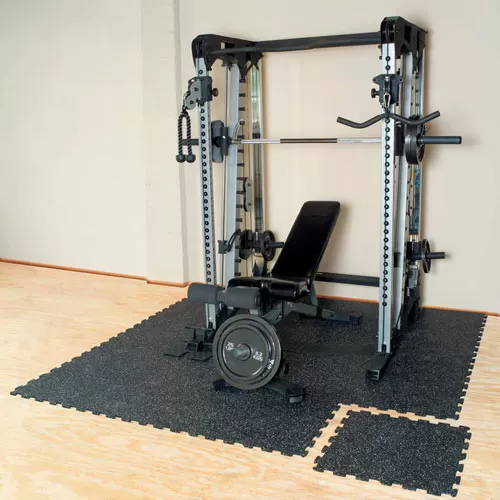
Interlocking Rubber Mats
Interlocking rubber mats can be installed in much the same way that interlocking foam mats are. For most installations, adhesive is not needed, but adhesive is recommended for some outdoor and gym installations where the mats will see heavy traffic.If you're working with mats with universal interlocking systems, you can lay the tiles in any direction and the tile edges can still be connected together. However, if your mats don't have universal interlocking systems, you'll need to make sure that they're aligned in such a way that their edges will fit together uniformly. In many cases these tiles will have directional arrows printed on the underside of the tiles. Otherwise looking for a unique corner interlock and make sure all tiles point that corner in the same direction.
Wall-to-Wall Interlocking Rubber Mat Installation
When performing a wall-to-wall installation, you will need to begin in one corner of the room. If the mats come with border strips, then attach the strips to the mat and place it appropriately. Then, work your way out and across the room. To connect the mats, line up their edges and press down on the edges to fit the mats together like puzzle pieces.When you meet the opposite wall, you will probably need to cut the final mats to fit. Measure the mats to determine where you need to make a cut, then align a straight edge to serve as your guide. Using a sharp utility knife, make multiple shallow scores as you make your way through the mat. (Place a piece of wood beneath the cutting area of mat to open the cut and reduce friction - and so that you don't cut your subfloor.) Repeat the process for the rest of the mats.
If you need to cut a large number of mats, you may need to replace the blade on your utility knife a number of times. Cutting the mats will become more difficult as your blade gets dull.
Island Rubber Mat Installation
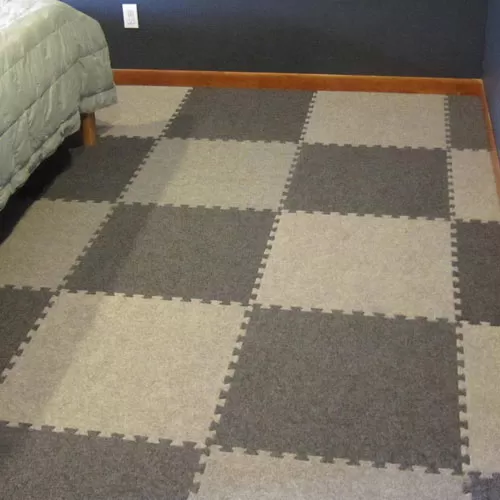
When installing interlocking rubber mats for an island installation, start in the middle of your room and work your way out. Some rubber mats are available with border strips, which you can use to create clean, finished edges. Install these strips last, once you've connected your floor mats together.Interlocking Carpet Mats
Installing interlocking carpet mats can instantly add a comfortable and welcoming feel to any space. Only install these mats on a flat, firm subfloor. Begin by cleaning your subfloor so that it is free of dirt, grease, and debris.Wall-to-Wall Interlocking Carpet Mat Installation
Start in one corner of your room and work your way out. Many interlocking carpet mats feature directional arrows to help you align the mats; place the mats so that the arrows are all facing in the same direction. Align the edges of the mats and press down firmly to fit them together.When you reach the opposite wall, you will likely need to trim your remaining mats to fit. Measure the mats so that you're leaving 1/2 inch of space between the mats and the wall. This allows the mats to expand and contract with fluctuations in the temperature.
Once you've determined where you need to cut, align a straight edge as a guide and use a sharp utility knife to cut through the mats. If the mats don't cut easily, you may need to change the blade in your knife.
You can then add border strips on to any mats that are facing out into the room, creating a finished edge.
Island Interlocking Carpet Mat Installation
When performing an island installation, start in the middle of the space that will be your new floor and work your way out. Connect the mats together by aligning their edges and pressing down firmly.As you reach the final perimeter tiles, you can attach border strips to their edges in the same manner. This creates a clean, finished look.
Removing Your Floor Mats
If you need to remove your floor mats in the future, you can do so easily as long as you haven't used adhesive. Puzzle style interlocking floor mats allow you to pull up any or all tiles you wish without disturbing the rest of the floor. In the case of lightweight foam mats, you may even be able to remove them in strips of tiles where heavier rubber mats may require you to pull up one tile at a time.If you will be reinstalling the floor and are working with different colored mats, it's a good idea to make note of where the different colors go, so that the installation is simplified. Greatmats floor plan designer can helpful again in this situation.
If you have any questions about installing your interlocking mats, please be sure to refer to the specifications for your product or give our customer service representatives a call.