How to Cut and Install Foam Floor Tiles - 2x2 Foam Squares
By Created: March, 2017 - Modified: July, 2021
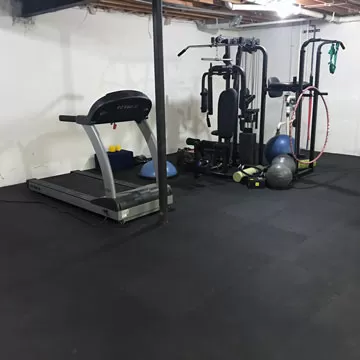
Related Product: Home Sport and Play Mat 3/4 Inch x 2x2 Ft.


When installers want to create a flat edge in the 2x2 foam tiles, using a utility knife to cut the puzzle edge off the tile works well. The flat edge then will fit up against a wall, resulting in a clean-looking installation of the mats.
Some 2x2 foot puzzle-style squares do have separate flat border edge pieces that fit into the puzzle edge to create the flat side. However, these border pieces are not an option with every model of tile or in cases where a full tile will not fit in a given space.
Beyond the ease of installation, 2x2 foam tiles are popular because they are often available in bulk at a cheap price. They can go over almost any type of subflooring, but they work especially well over concrete or other firm subfloors, providing a soft and cushioned floor covering.
They also have a wide range of color options. Some of these tiles even offer a faux wood grain look.
Here is some additional information to aid in the installation and cutting of these tiles.
What Tools Do I Need for Cutting 2x2 Foam Tiles?
Installers need only a few basic tools to complete the installation of these tiles by cutting them to create a flat edge. Those tools include:- Tape measure
- Straight edge
- Sharp utility knife
- Marker or pen to write on the foam
It will take less time to cut thin tiles versus thicker tiles. However, EVA foam is soft enough that the cutting process goes pretty quickly, once the installer has the hang of it. Having a brand new sharp blade makes a huge difference as well. This is why we recommend a utility knife as blades can be quickly, easily and inexpensively replaced as they start to dull.
To cut the puzzle style edge off the tile, follow these steps.
- Lay the straight edge across the tile in the desired cut position. Mark the cut line with the pen and then hold the straight edge along the line to give the utility knife a guide to make the cut.
- Use a series of light to medium pressure cutting strokes on the foam. Although it takes several strokes to deeply penetrate the foam with this technique, this is the safest way to ensure good results. In most cases, it’s also quicker and easier to make the cut and it leaves a cleaner edge.
- Use light pressure until a groove appears in the foam. Then, using the groove and the straight edge to help guide the knife, it’s possible to use a little more pressure safely. The installer will have less of a chance of having the straight edge or the knife slip off the cut line when using less pressure with the knife versus applying significant pressure.
- Cut most of the way through the soft EVA foam. Then fold the tile along the slice to create a crease on the opposite side. Use the straight edge as a guide along the crease to finish cutting through the foam from the opposite side.
Don’t cut halfway through the foam and then try to break the tile along the cut line. The foam won’t break and may cause an uneven tear in the foam, leaving the tile with a jagged edge.
Are All of the Interlocks the Same on Foam Puzzle Mats?
If looking to mix and match colors of foam mats and tiles to create an interesting look in the flooring installation, don’t automatically assume that the puzzle edges will fit together.When selecting mats of different colors that are in the same model of tile and with the same thickness measurement, the edges will fit together.
However, if selecting tiles from different models, it’s unlikely that the edges will fit properly. (The Greatmats customer service team can help installers determine whether certain models of interlocking puzzle tiles will connect properly.)
Each manufacturer may use a slightly different shape to the interlocking jigsaw edges. There is no universal size and dimensions of puzzle edges for all foam mats.
Even though installers may find that mats of different thicknesses will pop together, avoid this type of install. Connected mats of different thicknesses will have a tripping hazard because of the way the edge of the thicker mat sticks up higher.
Do I Need Border Strips for Interlocking Foam Tiles?
Installers do not have to use border strips with their foam interlocking tiles. However, using these tight-fitting strips will provide some benefits in certain situations.For those who don’t want to have to cut the 2x2 foam tiles to create a straight edge, look for a model with a border strip. These flat edge strips will fit into the same puzzle edges of the main mat, simplifying installation.
The border edges should have the same color as the main portion of the tile. This ensures a seamless look in the tile.
Understand that some models of 2x2 foam tiles will not have matching border strips available. This is especially true for inexpensive foam tiles. In cases like this, the installer will have to cut the edge of the tile for the desired flat edge.
When seeking the biggest variety in home and gym foam interlocking floor tiles, count on Greatmats. We carry dozens of these products, available in many colors, thicknesses, and sizes. Contact us for more details.